Tuesday, October 31, 2023

More Marl-Bear-ians

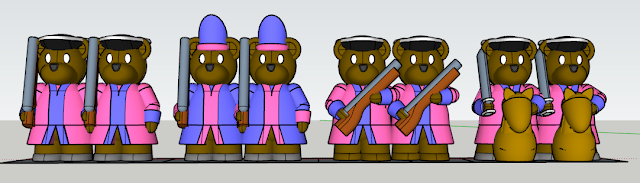
Line Infantry, Grenadiers, Advancing Line Infantry, Cavalry

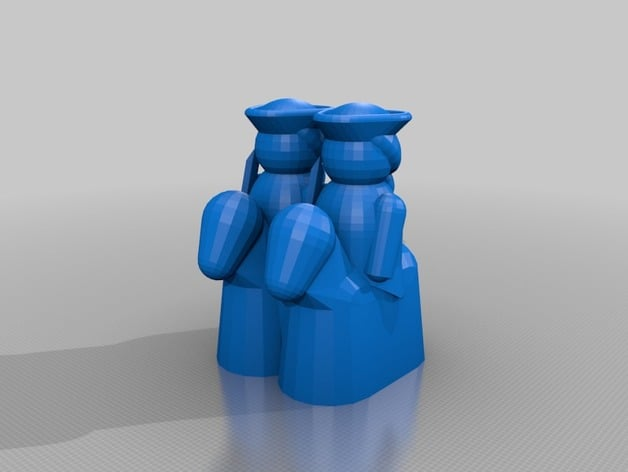
The line of teddy bear soldiers continues to grow.  I 3D printed a sample of three bears merged together at approx 40mm tall.  This seemed like the right height/mass to play with young kids.  The downside is that they ended up 2.25" across the widest point. My historical ranges are based on 2" grids. Ideally, I'd be able to reuse most of my terrain. Unfortunately, I don't think much of my existing terrain will work for the bears. They're just too wide at 40mm tall. Reusing the game mats is a worthy compromise though.  To fit the existing grid, I decreased the units to two bears. I increased the spacing a little bit so that they don't overlap their neighbors so much, and sit in a 1.75" square.  This should allow me to have a little space around to make scenery.  

Assuming square grid, the scenery will probably be limited to linear scenery on 2 of the sides.  I'll be utilizing some 2.5D ideas I've seen floating around for inspiration.  Limiting the scenery to two sides does allow it to store very compactly (a plus).  There are other options for terrain I'm considering.  

    Purely Linear Terrain:  Purely linear terrain would form the border between two grid cells.  It would inhibit/limit movement between cells vs. assuming that the terrain occupies the entirety of a cell.  

    Two-Part Terrain: Terrain disassembles into two parts; a base and an upper.  When a unit occupies a terrain feature (woods/house) the upper part is removed and the unit sits on top of the base.  For a forest, the base could be a layer of stumps and the trees trunks/leaves form the upper layer.  

Lord Bearington's Cavalry Trooper

In keeping with the toy-like theme, the Mal-Bear-ian cavalry rides into battle on bouncy horses.  I'm still debating whether or not the mounts need eyes, nostrils, manes, legs, or tails. I suspect at least eyes and tails are forthcoming. Keeping the bears' feet on the ground makes 3D printing much easier and results in a more stable model on the table at the expense of the historically obvious height difference between mounted and dismounted troops.  I'm not sure which I prefer yet.

The Command Element: A General and Bugler

Yet to Start Designs:

Artillery

Terrain: Buildings, forest, bridges

Drummer?

Standard Bear-er?

Pirates w/ bandana headgear?

Pirate w/ flowy shirt?

Work In Progress:

Horses: Eyes, nostrils, tails, manes, legs?

Monday, October 30, 2023

Expanding Armory


Musket, Blunderbuss, Modern Pistol, Flintlock Pistol

    I set out to make 18th Century Teddy Bear officers more distinct.  There might be a possibility of the Marl-Bear-Ians needing to deal with some "scurvy dogs" (probably still bears).  No self respecting pirate would be caught dead-or-alive without a few pistols.  The first pistol I've designed so far looks much more at home post 1911.  If I'm getting my history correct John-Bear Browning invented.  Maybe adding a lager cylinder could make it look something more like what a Cow-Bear would wield.  

    Also fortunately for myself, the weapons the bears use are the same size and scale that the humans in my other ranges have been using.  I think the bears unlocked quite a bit of variety.

Saturday, October 28, 2023

Marl-Bear-O's Wars

 My 4 year old daughter has been asking for her own armies.  I could probably just print her up any of the ranges I've already made and as long as they're pink, she'd be over the moon.  But... she saw the Eureka Bear ranges, and now she  HAS to have them.  They seem near impossible to get a hold of so I've been commissioned by my daughter to make her a bear army.  After looking through Napoleonic, 18th Century, Roman, and Late 19th Century Uniforms, she selected the 18th Century as the "prettiest".  So that's what we're going with.  The current plan is to have very simple unit types of infantry, cavalry, and artillery.  I'm open to any kid-friendly rules that are available, especially if I can cheat to help her win without her realizing.  She's good enough at counting that I can't "misread" dice anymore. 

The Duke of Marl-Bear-O


The Duke's Line Infantry Arrayed for Battle

If the bears stand roughly 25mm, the 3 bear line formation takes up 1.5" (pardon my unit mixing).  I could probably squeeze them and some simple terrain into a 2" grid.  This would keep the game more accessible for youngsters and fit with my preference for grids.  Hopefully at 25mm scale the facings and cuffs could be altered for each unit.  Hopefully, eventually we could make both kids a set and play some Song of Blades and Heroes or the like as they get older.  

Now to start another painting project that I'll never finish...

The Queen's Own Royal Guard Grenadiers


Tuesday, August 22, 2023

Another Commission

I got my second 3D design commission this week.  When I started 3D design, I shared some of my first models on Thingiverse.  Someone interested in an 18th Century army found my models and reached out to see if I could add a base with dice holder.  I told him that I had done some updating to the models he found and could expand the updated range to meet his expectations.  


Using my general design principles, and reusing assets wherever possible, I set about updating the range.  Below are some of the finished units.  


Wednesday, July 5, 2023

Testing the Compactness

 I took Far Side of the World to play test it with some family. In an effort to test its compactness and portability, I think I stumbled across a good storage solution, an ammo box. 


The 16”x24” mat folds in half and then rolls up, taking up most of the length. The instructions (and any other papers) fit nicely along the side, leaving the bulk of the box open for terrain and miniatures. I need to print some hills and design some river terrain. Once the terrain is complete, I’ll probably make some small trays/boxes to keep the miniatures organized. 


Overall I’m impressed with how compact I can make storing/transporting Far Side of the World. 


Although the game never even made it out of the box, it was a good test of portability. I’ve tried fishing tackle boxes before and they do a great job protecting miniatures but don’t offer a good solution for larger terrain, rules, or the mat. The ammo box did a good job of keeping everything together in a small enough box that makes it convenient to bring along. I can’t imagine many scenarios that would prevent me from bringing it along. 

Wednesday, June 28, 2023

From Digital Design to 3D Print

 One of the critical sub-hobbies of wargaming is acquiring and preparing miniatures.  There are many highly detailed miniatures sculpted by expert craftsmen and precisely casted to preserve the fine details available to purchase.  Unfortunately, my budget for wargaming doesn’t allow for great miniatures and my painting skills wouldn’t do them justice anyway, forcing me to either design my own or use 2D counters or stands.  I do have some basic 3D modeling skills developed through planning my house so I embarked on 3D design.  This will not be an explanation of design theory.  Some of that is covered in my contribution to the Second Portable Wargame Compendium.  This will be a more technical walkthrough of how I convert models designed in SketchUp to ready to print files.  In general the steps from design to print are as follows: Design, Export, Repair, Slice, Print.


The first step is the actual modeling.  I do all my modeling in SketchUp.  There are other free options that are better than SketchUp.  Fusion 360 is better than SketchUp for highly precise and technical models and Blender is much more capable of modeling organic curves and can behave much more like digital modeling clay.  Both have learning curves that can be overcome but will take practice.  Most basic work can be completed using only the free suite of tools in SketchUp.  I have expanded my SketchUp skills be searching out how-to’s on the internet.   


After you are satisfied with the model the next step is exporting it in a format that a 3D printer can use.  All modern 3D printers use the .stl file format.  SketchUp online now has a simple downloading function that saves the file to your drive as .stl files.  


If you’ve designed your model in Sketchup and downloaded it as an .stl file, you may need an additional repair step before you are ready to print.  For 3D printers to process a. stl into the type of code it requires, the item being printed must have a continuous exterior skin with no internal geometry.  If (like me) you’ve designed your models by overlapping many simple shapes into complex shapes, the model will have a lot of internal geometry.  This will certainly confuse the slicing software to the point where it will produce unusable slicing or refuse to slice entirely.  Luckily on Windows PCs there is a free program called 3D builder.  If upon opening the .stl file an error message about improperly defined models appears, you will need the repair step.  Fortunately repairing the file is as simple as clicking the error message.  3D Builder does the rest.  You will need to look at the file in detail after 3D builder repairs it.  The software tends to fill in very small, sharp “canyons”.  Most of the “fixes” it makes will not be significantly noticeable after printing, but rework on the modeling will be required if 3D builder isn’t giving good enough results.  Once you are satisfied with the repaired model, save the repaired file as another .stl.


Now that the file looks correct, the next step is to translate it into something useful for the 3D printer to use.  3D printers work by squeezing layers of molten plastic on top of each other.  Eventually these very short layers build into the shape of the final product.  The purpose of the slicing software is to generate the path and instructions that the printer should follow as it squeezes out the layers.  If you’re familiar with MRI imaging, each image is essentially a layer.  I use Cura as my slicer.  It is again free to download and use.  There are many settings to tweak and each can have significant impacts on the success and quality of the print. Most 3D printing communities will have proven profiles of settings that can serve as a starting point.  You will still need to tweak it for the exact brand/color of filament used.  I’ve needed to adjust printing temperature about 7% even in the same brand to account for the differences in color.  Mastering the exact settings that work for your printer and filament at the required level of detail can be a hobby all to itself.  Once the model is sliced, save the g-code to whichever data storage drive your printer uses.


Finally, the model is ready for printing.  Follow the printer’s instructions for startup and beginning a print.  I’ve had best results letting the heated bed warm up for a few minutes longer than the printer would do on its own.  It gives the whole bed a better chance to equalize in temperature and I think it reduces the number of prints that fail by becoming disconnected from the bed.  The next step is waiting patiently for the print to complete.  This will likely take several hours.  Checking on the printer from time to time is good, but watching the entire print process is certainly unnecessary.  If there is a failure mid-print, being available to stop it is certainly preferred to wasting the plastic that will be consumed in continuing to print an already failed model.  After the print is complete, let the model set on the print bed until it fully cools (reduces chance of warping) and remove it. 


At this point the print can be treated like any other plastic model.  If there is support material required to allow overhangs to print, the supports will need to be removed.  The model can be lightly sanded to remove any bumps or inconsistencies.  If the model is to be painted, a good coat of primer is very important.  The most common plastic used in 3D printing (PLA) is very slick and will require several coats of acrylic paint to get desirable results without primer.  


I hope this has brought some clarity to the 3D printing process to anyone considering purchasing a 3D printer for wargaming uses.  If the process seems too daunting, there are many small businesses that will take over the process starting at the repair step.  If you only need a few models printed, this will certainly be less expensive than purchasing a printer and dealing with the frustration of failed prints yourself.   

Wednesday, June 21, 2023

First Commission Designed, Printed, Sold and Painted

 It has been a particularly rewarding week for my wargaming hobby.  I received my copy of The Second Portable Wargame Compendium.  It is a great read, and full of interesting ideas.  It has been inspiring to see what everyone is doing with The Portable Wargame system.  It is probably the most adaptable system I've seen yet.  

My first commissioned 3D print work has also been completed.  In a matter of a couple early mornings before the kids wake up and a couple hours after they went to sleep, (using the theories discussed in my portion of The Second Portable Wargame Compendium), I was able to adapt existing models to fit a roughly Napoleonic force.  I would have probably expanded on some of the included detail but the customer preferred speed over detail.  I would have also tried to get a bearskin for the guard units and/or some more elaborate cavalry helmets.  The models printed over the course of a couple days, with a relatively high and unexplained failure rate.  I'm sure there's a setting off somewhere causing the failure rate.  The models shipped from Illinois to Wisconsin for $4.  The customer received them and immediately got to painting. Within a day or two he posted the following pictures.


It's great to see my work on the tabletop.  Hopefully this set gets some good years of use.  I retained the saved files for the set so if the customer ever wants to expand the set, it should be as easy as printing and shipping.  These are printed at 25mm.  I am confident that they could also be printed at 15mm or 20mm without too much hassle.